
 Doc Summary
Properties: Functional Overview #
Properties are configurable fields used to capture structured information about ideas and projects. They extend the standard fields—such as title and description—so teams can collect the additional context needed for evaluation, comparison, reporting, and Decision-making.
This article explains what properties are, why they matter, and how administrators set them up and connect them to idea or project funnels.
Why properties are important #
Standard fields are often not enough to evaluate an idea or project consistently. Different teams may need to capture information such as:
- Risk level
- Complexity or project size
- Expected lead time
- Feasibility
- Required expertise
- Target audience
- Implementation date
- Approval status
- External input required
- Critical success factors
- Problem description
- Project hours or effort
Properties make this information explicit and structured. Instead of storing important details only in free-text descriptions, teams can use consistent fields that are easier to complete, compare, filter, and report on.
The relevance of a Property depends on the decisions a funnel is designed to support. A Property should be included when it helps users evaluate, prioritize, compare, or move an item forward.
What a Property is #
A Property is an additional field that can be made available on an idea or project. Properties can use different field types depending on the kind of information they need to capture.
Examples of supported field types include:
- Dropdown — single selection
- Text — single-line or multi-line
- Number — plain number
- Number — percentage
- Date
- Time
- Other supported application field formats
The field type determines how users enter information and helps keep the collected data consistent.
Properties are created and maintained in the broader application settings. They are then selected for the funnels where they are relevant.
Where properties are used #
Properties can appear in several functional areas:
- Idea and project detail views, where users enter or review additional information
- Funnel configuration, where administrators decide which properties belong to a funnel
- Canvases, when a Canvas template is connected to selected properties
- Impact graphs or other evaluation views, when supported properties or scores are used for comparison
- Reporting and Decision-making workflows, where structured values can be reviewed across multiple items
Selecting a Property for a funnel makes it available for the items in that funnel. It does not mean every funnel must use every Property available in the application.
Access level and prerequisites #
Properties are primarily configured by an Admin.
Before setting up properties, make sure that:
- You have Admin access to Application Settings.
- The relevant funnel already exists.
- The required properties are available in the environment.
- You have permission to edit funnel configuration.
- You understand what information users and Decision-makers need from the funnel.
Set up properties in Application Settings #
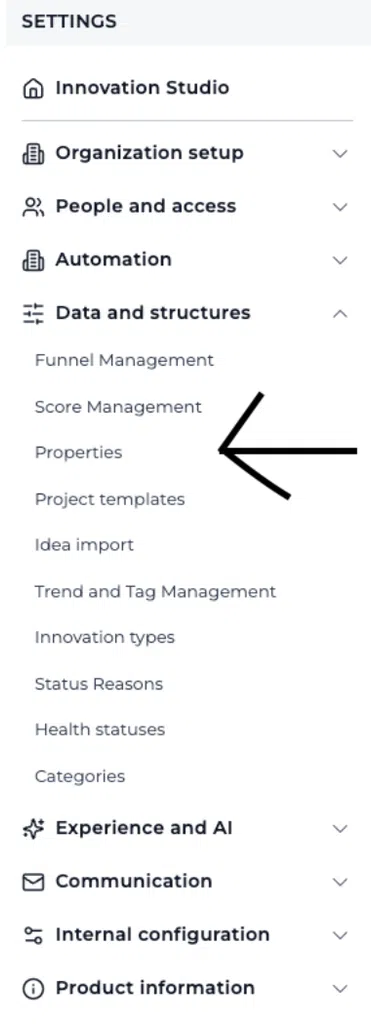
The first step is to create or review the properties that are available in the environment.
- Open Application Settings.
- Go to the area where application properties are managed.
- Review the existing properties.
- Create a new Property when the required field does not already exist.
- Give the Property a clear label that users will understand.
- Select the field type that matches the information being collected.
- Configure any available options, values, or other field-specific settings.
- Save the Property.
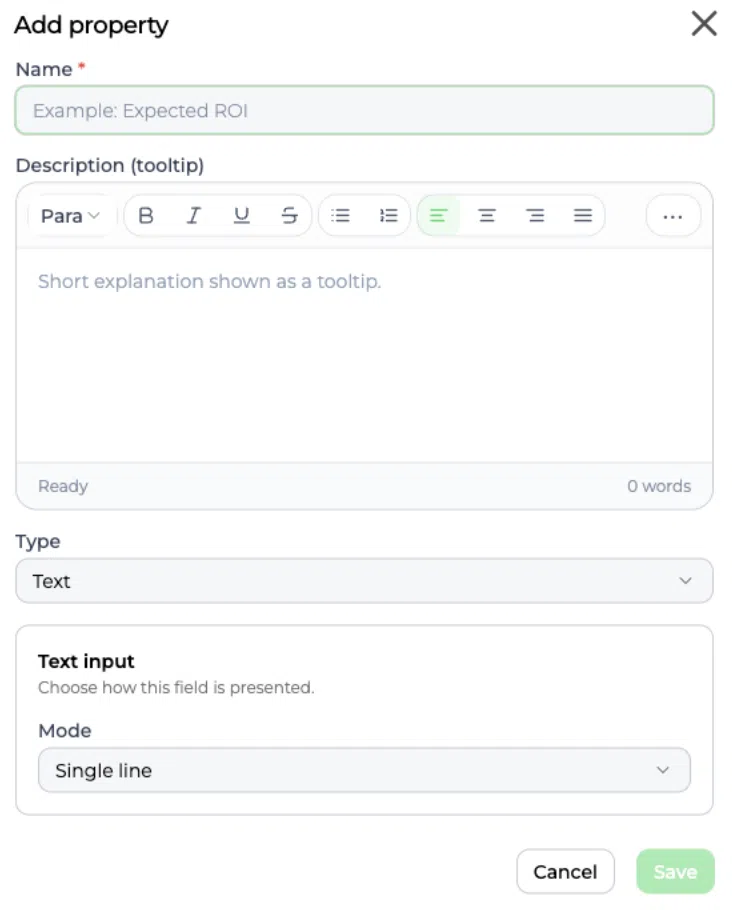
When creating a Property, avoid making multiple fields that capture the same information. Reuse an existing Property when it already meets the need.
Rich text properties and tooltips #
Properties can now use a rich text editor for the value and for the Property description shown as a tooltip. This makes it possible to provide clearer context, formatted guidance, and links without putting all information into a single plain-text line.
Rich text Property example: A Property called Implementation approach can contain a short explanation, a bulleted list of delivery steps, and a link to the team’s implementation guidance.
Rich text tooltip example: For a Property called Expected lead time, the tooltip could say: “Enter the expected time from approval to first delivery. Use weeks for consistency. See the Properties functional overview for guidance.”
Use rich text when users need explanation or structured descriptive content. Use numeric, percentage, date, time, or dropdown fields when the value must remain easy to compare, filter, score, or use in charts.
Pasting content into rich-text properties and tooltips #
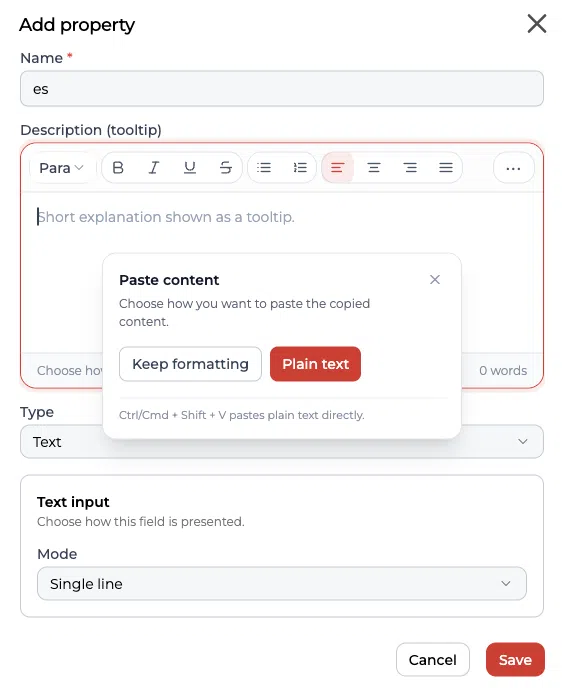
When you paste copied content into a rich-text Property or into the Description (tooltip) editor, a Paste content dialog appears with two options: Keep formatting and Plain text.
- Choose Keep formatting when you want to preserve formatting such as links, emphasis, lists, and paragraph structure.
- Choose Plain text when you want to remove the copied formatting and keep only the words.
- To paste plain text directly without opening the dialog, use Ctrl + Shift + V on Windows or Cmd + Shift + V on Mac.
Example: If you copy a Property tooltip containing a link to an internal process guide, choose Keep formatting so the link and structure remain available to users. If you copy text from a document and want to remove its fonts, colors, and layout, choose Plain text instead.
Use Keep formatting when the copied content has useful structure. Use Plain text when you want to clean the content before applying formatting directly in the editor.
Connect properties to a funnel #
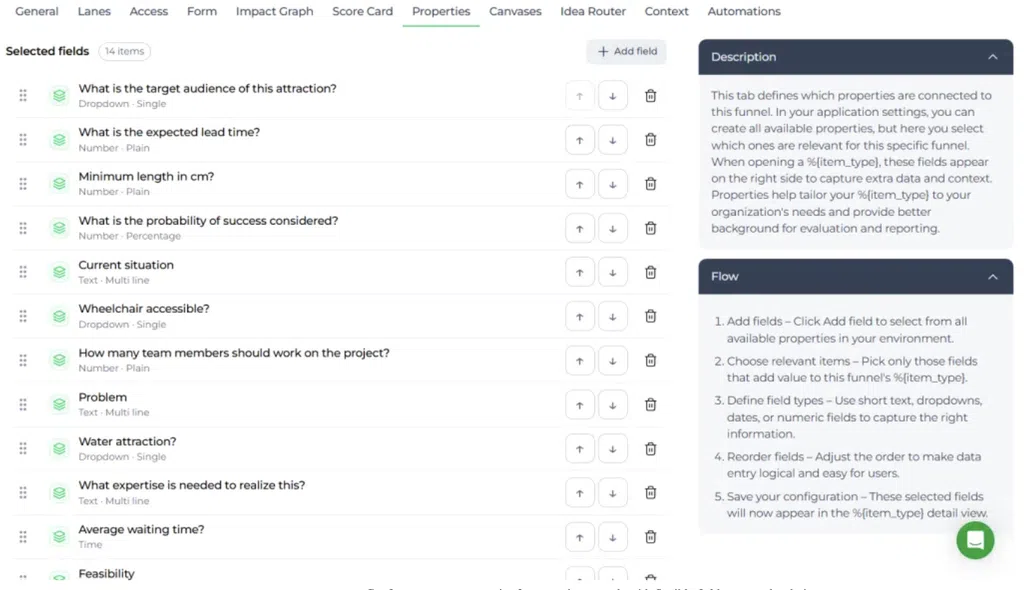
After the properties are available, administrators can choose which ones should be used in a specific idea or project funnel.
Navigation path:
Application Settings → Funnel configuration → Open a funnel → Properties
To connect properties to a funnel:
- Open Application Settings.
- Go to Funnel configuration.
- Open the funnel you want to edit.
- Select the Properties tab.
- Review the properties already connected to the funnel.
- Select Add field.
- Choose the properties that are relevant to this funnel.
- Review the field labels and field types.
- Use the move controls to place the properties in a practical order.
- Remove any Property that is no longer relevant.
- Save the funnel configuration.
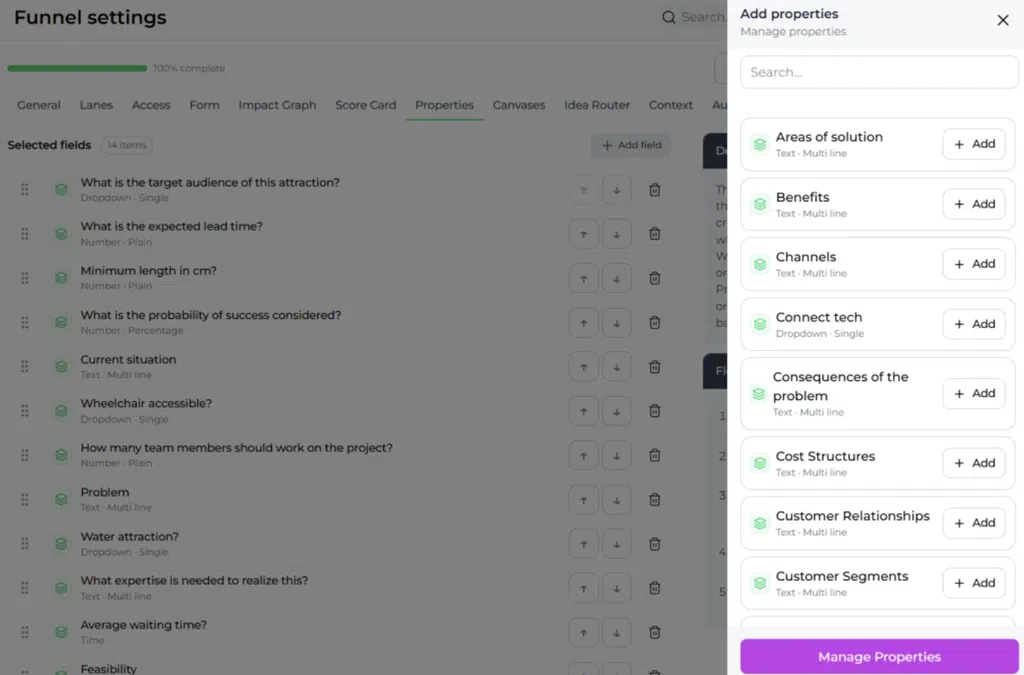
The selected properties then become available in the item detail view for ideas or projects in that funnel.
Choose the right properties #
A useful Property should support a clear purpose. Before adding one, ask:
- What Decision will this information support?
- Who will complete or use the field?
- Is the information needed for every item in this funnel?
- Should users select from fixed options or enter free text?
- Will the value be compared, filtered, scored, or reported on later?
- Does the field duplicate information already captured elsewhere?
Keep the Property set focused. Too many fields can make an item difficult to complete and can reduce the quality of the information users provide.
Organize the display order
#
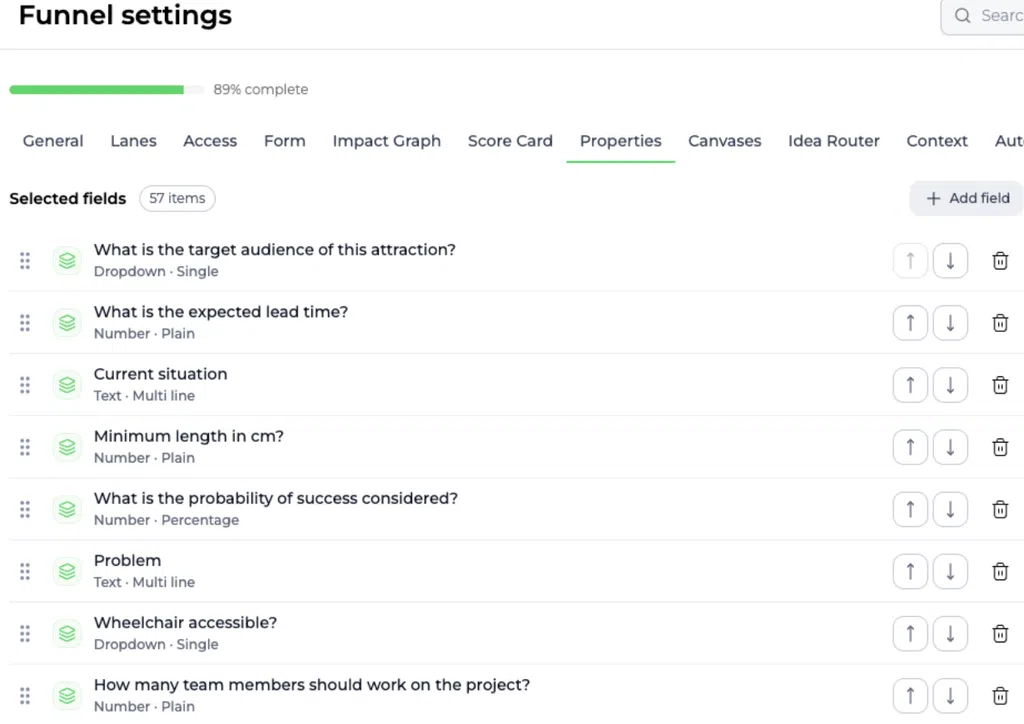
The order of properties affects how users experience the item detail view. Place the most important or frequently used fields first, followed by supporting information.
A practical order may be:
- Evaluation-critical information
- Audience, customer, or Problem context
- Feasibility, Risk, and complexity
- Timing and implementation details
- Approval or administrative information
The best order depends on the purpose of the funnel and the workflow users follow.
Properties in item detail views #
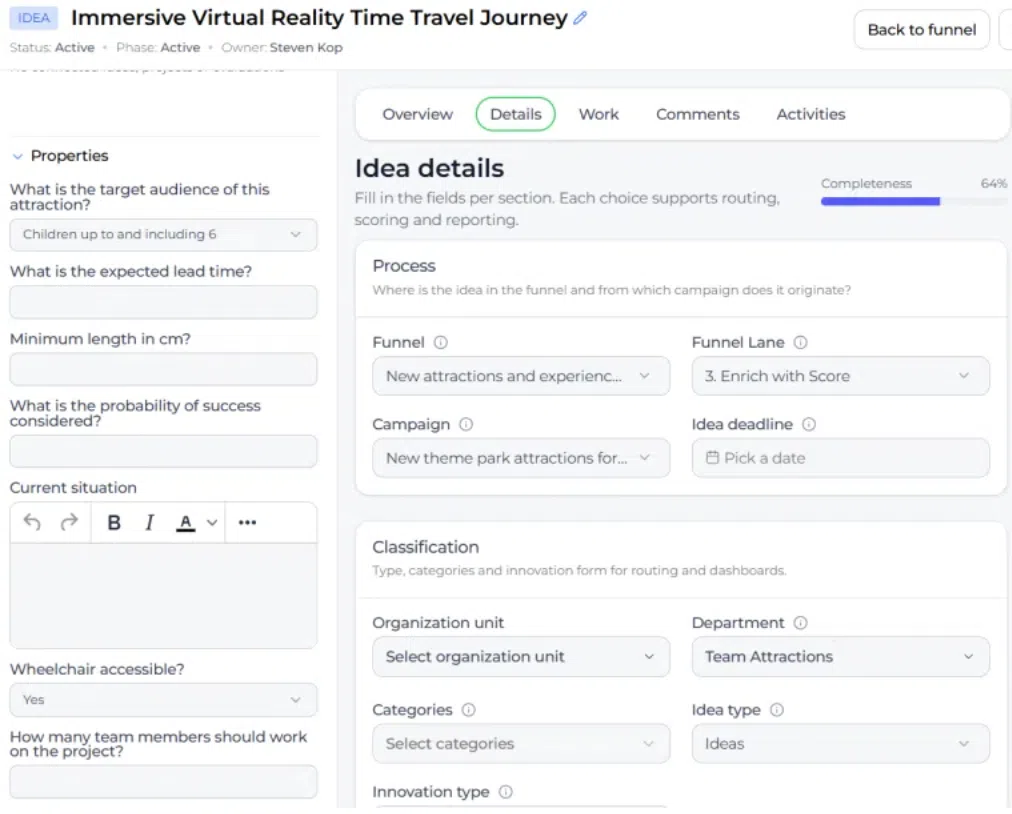
Once a Property is connected to a funnel, users can enter or review its value in the relevant idea or project detail view. These fields provide additional context beyond the standard form fields.
For example, an attraction concept might use properties such as:
- Target audience
- Expected lead time
- Minimum length
- Wheelchair accessibility
- Average waiting time
- Feasibility
- Required expertise
This allows reviewers to compare concepts using consistent information rather than relying only on title, description, or informal discussion.
Properties and Canvases #
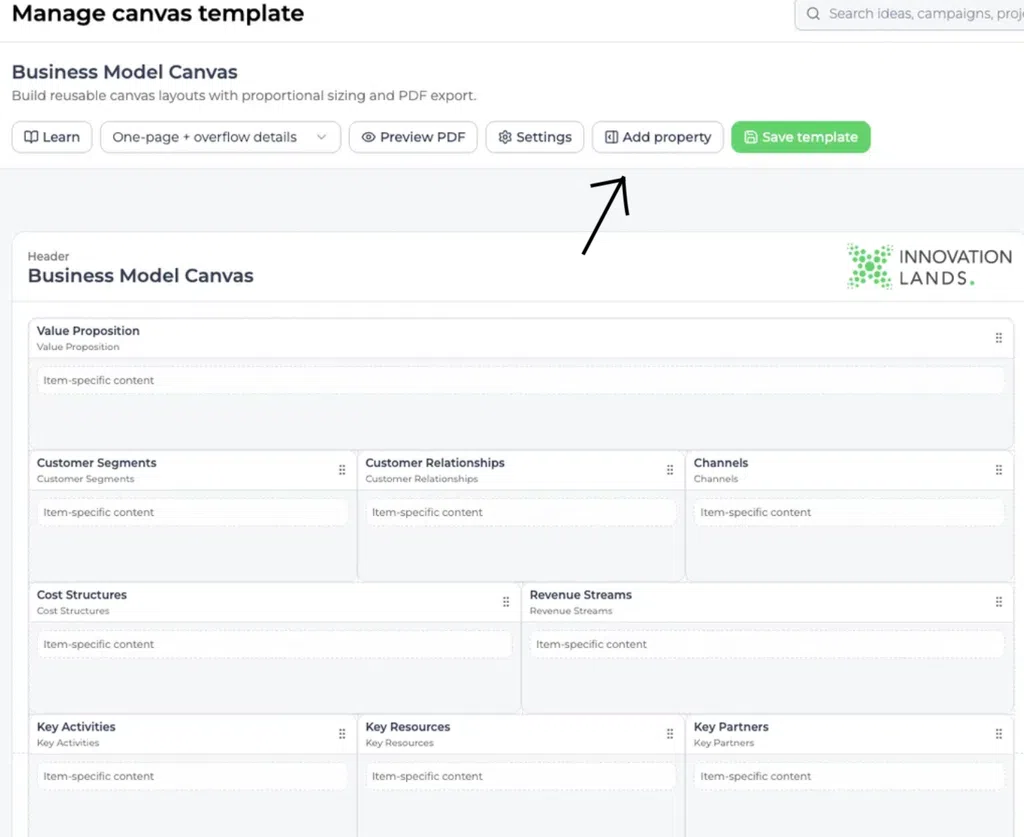
Canvas templates can display connected properties in a structured visual layout. The template controls which fields appear and how they are arranged, while the idea or project supplies the current values.
If a Property value is missing from a Canvas:
- Check that the template is connected to the intended Property.
- Check that the Property is available for the relevant idea or project.
- Check whether the source item contains a value.
- Refresh or reopen the Canvas if necessary.
Only the properties selected in the Canvas template are shown there.
Properties and comparison #
Structured properties help teams compare multiple ideas or projects using the same dimensions. For example, a team may compare items by Risk, feasibility, expected lead time, target audience, or implementation effort.
Properties are most useful for comparison when:
- The field has a clear definition.
- Users understand how to enter the value.
- Options are consistent across items.
- The field is relevant to the funnel’s Decision process.
- The value will actually be used in reviews, scoring, reporting, or prioritization.
Maintaining properties over time #
Review properties periodically as the funnel and business process evolve.
When adjusting the setup:
- Remove fields that are no longer used.
- Keep labels clear and consistent.
- Use the most appropriate field type.
- Review whether dropdown options still reflect current terminology.
- Avoid collecting information that has no clear downstream use.
- Align the Property set with evaluation, reporting, and Decision-making goals.
- Consider the effect on existing items before changing a Property used across a funnel.
Because properties affect the detail view for all items in a funnel, changes should be made carefully and communicated to users when necessary.
Summary #
Properties provide structured, configurable fields for the information that ideas and projects need beyond their standard form fields.
The overall setup is:
- Create or review properties in Application Settings.
- Choose an appropriate field type and configuration.
- Open the relevant funnel’s Properties tab.
- Add only the properties needed for that funnel.
- Arrange them in a logical order.
- Save and review the result in an idea or project detail view.
- Revisit the setup as the funnel and Decision process change.
A well-designed Property setup helps teams collect better information, compare items more consistently, and make more informed decisions.



 English
 Dutch
Dutch Portuguese
 Spanish
 French
 German
 Arabic